Guide:Bonbun's Basic Guide
Howdy, ya'll! This is your resident mech engineer Soubrette here. Today I'm going to be instructing you all on the basics of how to prepare your mech for combat on the field. While a lot of you new pilots might be used to seeing the old folks just jumping into their rides and being ready to fight, you don't always get to see the work they have to put in first to have their mechs ready to go at a moment's notice. But today, I'll be showing you just what it takes to be ready to drop into an engagement zone at the drop of a hat. Not mine though, it stays firmly on top of my head.
To start, I'm going to assume you already have your mech situated and your weapons selected for your load-out. I'd advise you all to keep your chosen weapons stored close to your mech and ready to go. This will save you a lot of time having to find your weapons, load them onto your mech, and figure out if your mech can even carry their weight before even trying to boot up your systems. You're likely going to want to have each of your mechs' weapons stored with them, even if they share weapons. That way, if you have to re-arm to a different mech in the middle of a battle, you won't have to waste any more time before you can get back to the fight. The same goes for different load-outs for the same chassis.
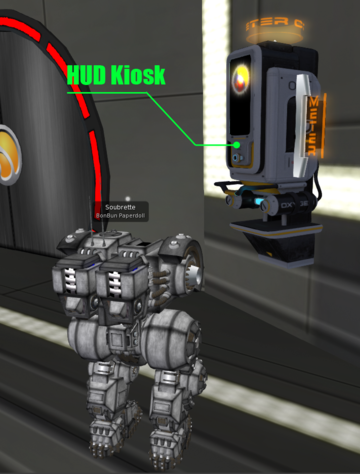
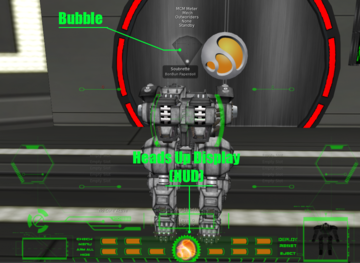
The first step is to make sure your Heads Up Display (HUD) is up to date and installed in your mech properly. The same goes for your External Indicator (Bubble). You need to have both of these equipped and working before your mech will even start to boot up. Kiosks are available all around the drop ship, so you all've got no excuse not to have one and not to keep it up to date. If you need to get one because of an update to the software, or if your old ones are acting up for some reason, just activate the kiosk and unbox a new copy. Be sure that once you have one that's working, you replace all old copies of both the HUD and the External Indicator. It's a good idea to not just depend on one copy of your HUD for every mech. It'll save you a lot of time and headaches if you have one installed with each of your mechs. Remember, the less you have to go searching for between boot ups, the quicker you can get into the action.
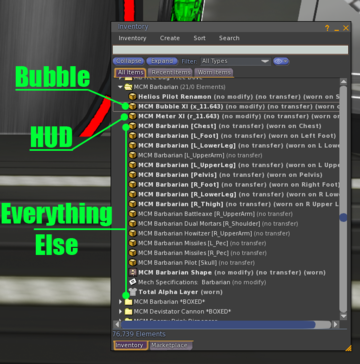
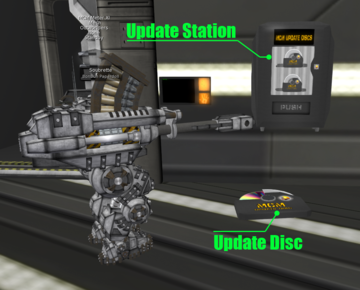
Now that you've got your mech, weapons, utilities (you didn't forget those, did ya?), and HUD together, it's time to make sure they're all up to date. Remember, the firmware and interface for your weapons, as well as the System Cores of your mech need to be all up to date, else they won't communicate with each other properly, and your mech won't be able to arm it's weapons. Usually, this is pretty easy to do, so it's a good idea to double-check for updates periodically to make sure everything is working in top condition. Simply have your mech and weapons equipped and activate one of the Update Stations, located on your drop ship. This will shut down your mech, and run a system scan on your mech and all it's equipped weapons and utilities. If it detects anything out of date, it will issue you an update disc. Simply set out and activate the disc, and it will wirelessly update the firmware or operating system for your weapons and mech. Occasionally some of your weapons may require a more extensive update beyond just their firmware. If this is the case, your update disc will supply you with the required updates so you can swap out your older weapons for the newer versions. If something goes seriously wrong, such as a weapon or utility failing to update, it may indicate that there may be something critically wrong with your weapons or mech, or that a major update occurred. In this case, you'll have to contact a member of the staff on board the drop ship for help. Don't worry, we don't bite much.
Right. Now that you all know how to load up your mech and weapons, and make sure they're all up to date, it's time you know WHAT to load your mech up with. As much as you all might want to put an Orbital Canon on your Mantis, you all will have to take a little dose of reality and accept that some things just aren't going to work out. Even with as massive as some of them can be, each mech has a limit to just how much weight it's able to carry. Thankfully, most mechs come with enough sensors and system checks to be able to know when they are too far over their limits, and will warn you before you try to go out with a load-out that will end up breaking your mech's leg actuators. Every mech's weight limit, as well as the capacity is has to hold weapons and equipment are listed as it's Load-Points. Every mech has a limit to it's Load-Points, and a mech's size doesn't always mean more room, but it's a good rule of thumb that the larger mechs will be able to handle more weight. For example, the little Duster is a pretty small mech even at a weight of 40 tons, and it can only support a pretty meager 17 Load-Points of equipment. On the other end of the scale, the Minotaur tips the scales at a staggering 100 tons, and has room for a massive 91 Load-Points of equipment. This means that not only will the Minotaur be able to carry more weapons, but far larger guns than Duster. Remember though, bigger doesn't always mean better. Plenty of light weight weapons can pack just as much of a punch as many far heavier guns. But because a mech like the Minotaur or Sumo have such a higher limit for Load-Points, they'll often have more of these high damage weapons than smaller mechs like the Duster or Condor.
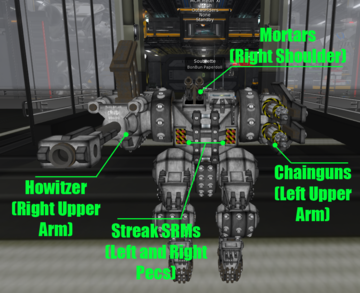
Every piece of equipment you can mount onto your mech, including weapons, utilities, heat sinks, whatever, not only has a Load-Cost the mech needs to be able to support, but also requires Mounting Points. Load-Costs are pretty straight forward. An Extended Heat Sink, for example, has a cost of 5 Load-Points. If your mech doesn't have at least 5 free Load-Points, you can't add the Extended Heat Sink to your load-out. Add up the cost of every weapon or utility you want to equip your mech with, and if it doesn't go over your mech's Load-Points, then your mech can support it. Mounting Points, on the other hand, are a bit more tricky. Unlike Load-Points and Cost, which is simply adding up everything, every weapon and utility can only be mounted to particular locations. Often you'll find that some weapons and utilities will come with options as to where they can be mounted. To keep things simple, these available slots are labeled to match with corresponding locations on your typical humanoid mech. The are Upper Arms (both right and left), Lower Arms, Shoulders, Pecs, Spine, and Stomach. You'll quickly notice that most weapons will mount to either the Upper Arms or the Shoulders, with Pecs and Spine mounted weapons being next most common, and Stomach or Lower Arm mounted weapons being the most rare. While you all might be tempted to find weapons for every mounting point you can, keep in mind that you're still going to need room to mount things like Heat Sinks unless you want to run around in an oven set to broil. So you're going to have to decide which weapons you absolutely need and which mounting points you can leave free to devote to Heat Sinks or Coolant so you don't just cook yourself. And if you want to take advantage of Jump Jets, you'll have to give up the often very powerful weapons that only mount to a mech's Spine.
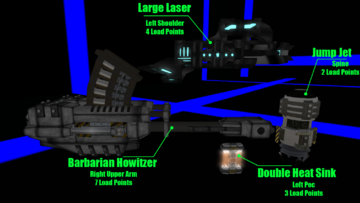
For example, Large Lasers are a good, solid choice for weapons, since they have options to mount to a mech's Upper Arms, Shoulders, and Pecs, letting you load up a mech with plenty of long-range, high damage weaponry. But all those lasers will generate a lot of heat. Double Heat Sinks would make for a good way to handle all that built up heat, but they mount to the Shoulder and Pec points as well, so you'll have to decide if you can afford to deal with all that heat, or if you might have to sacrifice a laser or two for those extra heat sinks. Thankfully, Double Heat Sinks also mount to a mech's Stomach and Spine points, unlike the Large Lasers. But then, you'll be having to give up anything else that would require those mounting points, like Jump Jets. It's all a balancing act, and as pilots, you're going to have to make that choice for yourself. And remember, only one weapon or utility can use the same mounting point, so no trying to sneak heat sinks under your weapons, else your mech's System Core will have a fit and refuse to boot up.
Now, with your Load-Points, Mounting Points, and Updates taken care of, you're finally ready to get out on the field. Now we're ready for the action! Well, almost. First you've gotta figure out how to get onto the field. Thankfully, this is pretty easy. If you're looking to just get onto the field and hunt down any target of opportunity, all you have to do is hit the button on your HUD labeled 'Deploy'. You'll be given a screen with a listing of known combat zones to deploy to. Just select which area you want to head out to and you'll be sent there on a random drop.
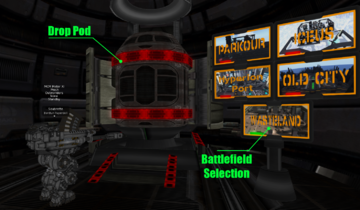
If you've signed up for a planned engagement as part of a team, you'll be given instructions as part of the pre-battle planning. In this case, once you and your team are ready, you'll be using the near-by drop pods to deploy onto the battlefield along with the rest of your team. Remember to wait till the rest of your team is ready to engage and the command is given before trying to charge out into combat. Getting caught out on your own with no support is a quick way to turn your mech into a recyclable scrap.
Before you boot up your mech's systems, it's always worth it to do one last minute check to make sure everything is ready. Just pull up your system's Text Interface (Local Chat) and enter the command '/1report'. Your mech's system core will return Net Code (web link) that will bring up a readout of your mech and everything equipped to it. This has some useful information you should get familiar with. Your mech's status as well as it's max weight and how much of it you're currently using, it's current armor, native cooling, and when it will do an emergency shut-down due to heat. It will also list every weapon and equipment you have loaded, as well as their basic statistics. Most importantly if there are any issues that might prevent you from booting up, this report will highlight them so you'll know just what the issue is, and what you'll have to do to correct it. If everything seems correct, you're finally ready to boot up.
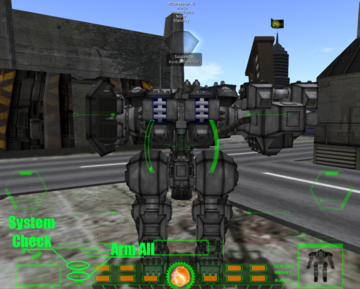
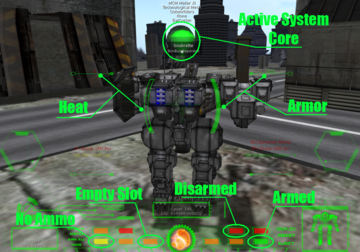
One last step before you can get stuck into the action. On your mech's HUD, hit the button labeled 'Check'. This will run one final quick check of your systems and equipment, and give you a short breakdown of what you have loaded. You'll get a confirmation window, asking if this is correct. Select 'Yes', and your mech's System Core will engage and interface with all your equipped weapons and utilities. You'll see your HUD light up for a moment, with several buttons flashing green then red. These buttons toggle your weapons and utilities. Red for disarmed, Green for armed, Yellow if the weapons is out of ammo, and Orange if there's nothing mounted in that location. Simply press the button to toggle equipment off and on, or use the 'Arm All' button to activate everything at once. Remember that all utilities, even passive ones such as heat sinks, will only work if they are armed, and some like Jump Jets or Coolant can only be activated if they are armed.
Above these buttons your HUD will also give you a list of your weapons and equipment, color-codes as the buttons, as well as showing you the current ammo count for weapons that use ammunition. Above that is your mech's current remaining Armor, as well as the amount of Heat it's built up currently.
Once you inevitably find out what happens to new pilots who over-extend themselves in a fire-fight, you'll need to be evaced back to the drop ship before you can return to combat. Simply press the Reset button on your HUD, and you along with what remains of your mech will (usually) be recovered back to the drop bay you used last. Once your mech is no longer a smoking wreck, you'll be able to return to the engagement zone and boot up once more for a second try at not being turned into post-modern art.
Hopefully this will help you new pilots to not completely turn the mechs I build for ya'll into scrap metal, but we'll have to see on that. Next time we'll go over something a bit more technical, but for now watch yourselves out there on the field, and happy hunting.